Glassless Mirror Assembly Instructions - Horizontal with Rolling Base
All Mirror Panels come with two pre-installed aluminum angle brackets for wall mounting. Remove these brackets if you are using the mirror base. Keep the clear plastic sheet over the mirror face to protect it while mounting the bases.
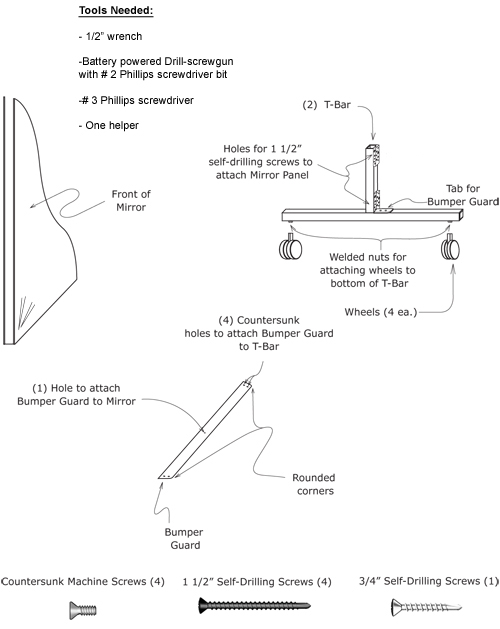
1) Attach Bumper Guard to short tabs in T-Bars using the four countersunk screws provided. Place rounded corners of Bumper Guard away from square tube of T-Bar. Tighten these countersunk screws completely with a #3 Phillips-head screwdriver.
2) Hand tighten wheels to the welded nuts on the bottom of the T-Bar, then use a 1/2" wrench to securely tighten wheels.
3) Have a helper hold Mirror Panel centered on base with plastic cover still taped on face (Remove tape from plastic only on side where you are screwing.) Side edges of mirror should be centered and flush with ends of the bumper plates.
4) Use screw gun with #2 bit to drive four 1 1/2" self-drilling screws through the vertical square tube on T-Bar into the Mirror Panel's aluminum frame to secure Mirror Panel to T-Bar. Be careful not to over tighten screws. Do not push excessively on mirror surface.
5) Use screw gun with #2 bit to drive one 3/4" self-drilling screw through the hole in bottom center of Bumper Guard. This secures Bumper Guard to bottom of Mirror Panel. Do not over tighten screws.
6) Plastic protective cover may now be removed from Mirror Panel.