Free Standing Ballet Barre Assembly and Operation
|
14' and 16'
|
||||
|
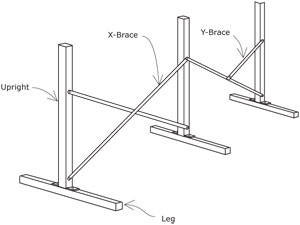
Single or Double Sided Free-Standing Ballet Barre
|
||||
| YOU SHOULD HAVE: | ||||
| For single-sided unit | For double-sided unit | |||
| - | one 14' or 16' wood barre | - | two 14' or 16' wood barres | |
| - | one large folding x-brace | - | one large folding x-brace | |
| - | One folding y-brace | - | one folding y-brace | |
| - | three 41" long uprights | - | three 41" long uprights | |
| - | three 30" long legs | - | three 30" long legs | |
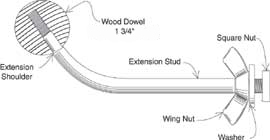
| - | three 9" "extension studs" | - | six 9" "extension studs" | |
| - | three large wing nuts | - | six large wing nuts | |
| - | three square nuts and three washers | - | six square suts and six washers | |
| - | six 3/8" bolts and six small wing nuts | - | six 3/8" bolts and small wing nuts | |
|
All wood ballet barres are shipped in individual cardboard tubes and are hand-sanded without a liquid finish. All ballet barres are made of 1-3/4" diameter Poplar wood. For an additional cost, Maple, Oak and other woods are also available in 1-3/4" diameter. |
||||||
| SETTING UP THE BASE: | ||||||
| Bolt on the three Legs to the three Uprights with the six 3/8" bolts provided. | THE BASE SHOULD LOOK LIKE THIS: | |||||
|
||||||
(See Drawing)
|
||||||
| PUTTING THE BARRE ASSEMBLIES TOGETHER: | ||||||
|
Screw the extension studs into the holes in the wood barres clockwise by hand until the shoulders touch the wood. An additional
1/2 turn may be necessary to straighten out the extension studs and make them all perpendicular to the wooden barre
and parallel to each other.
USE CAUTION!!!! IF YOU SCREW THEM TOO MUCH, IT WILL SPLIT THE WOOD!!!!
Screw on wing nuts, washers, and square nuts exactly as shown in illustration
|
|||||
| MOUNTING BARRE ASSEMBLY: | ||||||
| Pick up bar assembly and slide the square nut, on the end of each extension stud, into the top slot of its corresponding channel (washers and wing nuts are outside). Tighten the wing nuts when the barre is at your desired height. To adjust barre, loosen the |
wing nut and slide it up and down the channel, then retightens the wing nut. Grab the wood barre at the point where the extension
stud screws in and wiggle the barre up and down when tightening and loosening the wing Nut.
|
|||||
|
ALSO AVAILABLE: 4', 6', 8' and 10' Free Standing Ballet Barres |
||||||
|
WARP TOLERANCE FOR WOOD IS 3/16" PER 4' SECTION
|
||||||
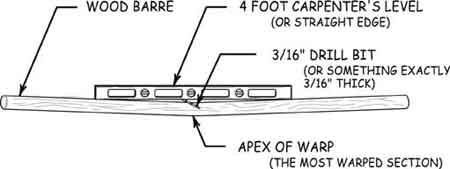
1. Sight down barre to determine apex of warp. 2. Center the level on apex and place 3/16" drill bit in gap. 3. If drill bit slides freely and completely through gap, the barre is beyond our warp tolerance. |
||||||